SmartRG SR505n
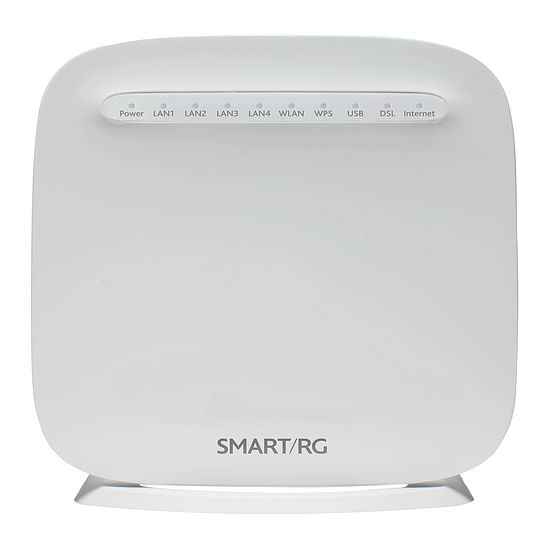
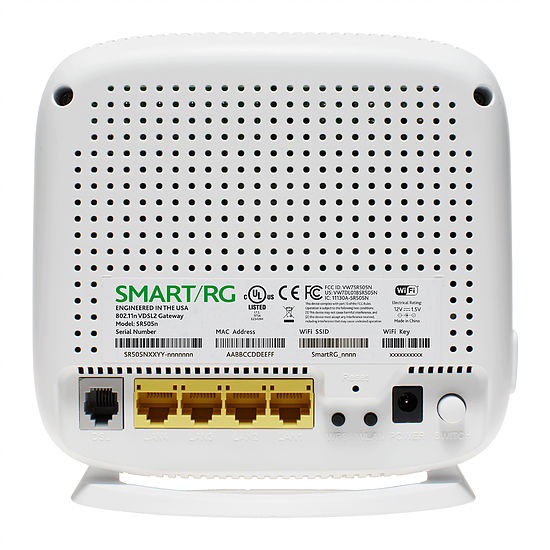
Sold from Sep 2014 to Aug 2018
¶ Preparation
Updated: 2020-09-08
Recommended Firmware Version: 2.6.2.6. Please see the Firmware section below for more details.
The SmartRG SR505n modem router supports both ADSL mode and VDSL mode. Provided it is configured correctly, it can be switched between ADSL and VDSL plans without the owner having to buy a new modem or even re-configure your existing one.
- Note: Fees for changing plans may still apply. Consult: DSL Rates
Before you start configuring the SmartRG SR505n, there are 4 things to check:
- Firmware Check: Check if you’re using older firmware and upgrade to the recommended firmware version. If you’re unable to access the internet to request newer firmware, note that the screenshots shown and steps outlined may not align with what you see. Contact the support@ncf.ca for assistance if you run into problems.
- Factory Settings and Standard Configuration: These instructions assume you’re configuring SmartRG SR505n modem out of the box or after a factory reset. If the modem is not new, it is recommended to reset the modem to the factory defaults by holding down the reset button with a paper clip for ~10 seconds.
- Also, these settings are our recommendations for most NCF members. To learn more about making custom changes to your particular modem, consult the manual.
- Modem Installation - Configure over Ethernet: Consult the SmartRG SR505N modem instruction sheet (page 1) on how to set up the modem and connect to it over ethernet. We do not recommend configuring your modem over a Wi-Fi connection.
- Configurations Methods: The 2 main ways of configuring the SmartRG SR505n modem:
- Using a custom configuration File: You can request an NCF custom configuration file for your NCF DSL connection from support@ncf.ca (available to NCF members only)
- Manually following configuration steps.
- Configuration Options:
- Routed Operation with WiFi - Standard configuration for most members with SmartRG SR505n serving as both modem and Wi-Fi router
- Routed Operation with separate WiFi Router - Recommended configuration for members with their own Wi-Fi router. The modem will make the PPPoE authentication and both devices will negotiate DHCP
- Bridged Operation with separate WiFi Router - (Advanced) for members with their own routers and are knowledgeable about managing it themselves. The router with handle both authentication and DHCP.
¶ Using Custom Configuration File
Your SmartRG modem can be configured for Routed or Bridged Operation by a custom configuration file. The custom configuration will include parameters specific to your NCF account.
1. Request a custom configuration file from support@ncf.ca and save it at a location you will remember.
¶ Log into Modem Web Interface
2. Enter http://192.168.1.1 info the address bar at in your web browser. Click on Manage Gateway (advanced) and login with username: admin and password: admin (if your modem has been properly reset. If not try your NCF DSL password). 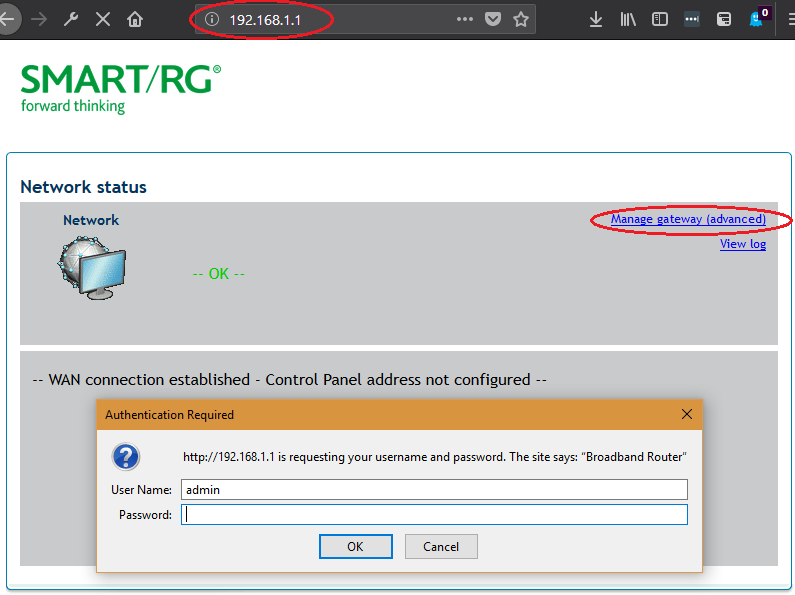
¶ Uploading the File
3. Go to the Management Menu link, and then click on the Settings sub-menu link and then on the Update.
- Click on the Browse link (in the Update Running Broadband Router Settings section) and navigate to the custom configuration file you saved.
- Click on Update Running Settings.
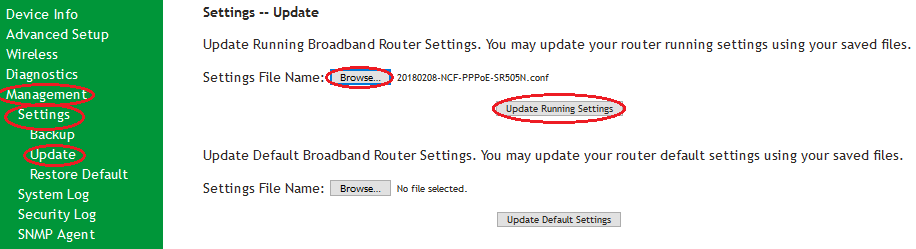 4. Once the file upload begins, it can take 2 to 5 minutes to be completed and for your modem to be fully connected online. Resist the urge to make changes to the modem’s configuration during this time.
¶ Routed Operation with Wi-Fi
NCF Support is available to make configuring your SmartRG modem easier and to help you avoid potential mistakes. Here are simpler configuration options for your SmartRG modem:
- You can request a custom configuration file for your NCF DSL connection from support@ncf.ca.
- You may need an alternate means of accessing the internet to download the configuration file.
- Call 613-721-1773 x0 to book a Modem Appointment.
¶ Checklist
Steps |
Menu Navigation |
Parameters |
|
|---|---|---|---|
2 |
http://192.168.1.1 → Manage Gateway (Advanced) |
User Name: admin Password: admin |
|
3 |
Advanced Setup → WAN Service |
Remove ppp0.1 from WAN Service Table |
|
4 |
Advanced Setup → Layer2 Interface → ATM Interface |
Add ATM: vpi:0 vci:35 DSL Latency: FAST and INTERLEAVED |
|
5 |
Advanced Setup → Layer2 Interface → PTM Interface |
Remove ptm0 with Path0 Add PTM: DSL Latency: FAST and INTERLEAVED |
|
6 |
Advanced Setup → WAN Service |
Add atm0/(4_0_35) PPPoE (pppoe_4_0_35)
|
|
7 |
Advanced Setup → WAN Service |
Add ptm0/(4_1_1) PPPoE(pppoe_4_1_1.35)
|
|
8 |
Advanced Setup → UPnP |
Disable uPnP |
|
9 |
Wireless |
SSID (Wi-Fi Name) to format NCF_0000 |
|
10 |
Wireless → Security |
|
|
11 |
Management → Access Controls → Passwords |
|
|
12 |
Management → Access Controls → Accounts |
Delete/Modify Account
|
|
13 |
Management → Management Server |
|
|
14 |
Management → System Log |
Configure System Log
|
|
15 |
Management → Internet Time |
|
|
16 |
Management → Settings → Backup |
|
Steps to Configure SR505N for Routed Operation
¶ Log into Modem Web Interface
1. Enter http://192.168.1.1 info the address bar at in your web browser. Click on Manage Gateway (advanced) and login with username: admin and password: admin (if your modem has been properly reset. If not try your NCF DSL password).
¶ WAN Cleanup
2. Click on the Advanced Setup menu, then on the WAN Service sub-menu. Select the Remove checkbox on the ppp0.1 interface listed on WAN Service Setup table and click Remove at the bottom of the page. 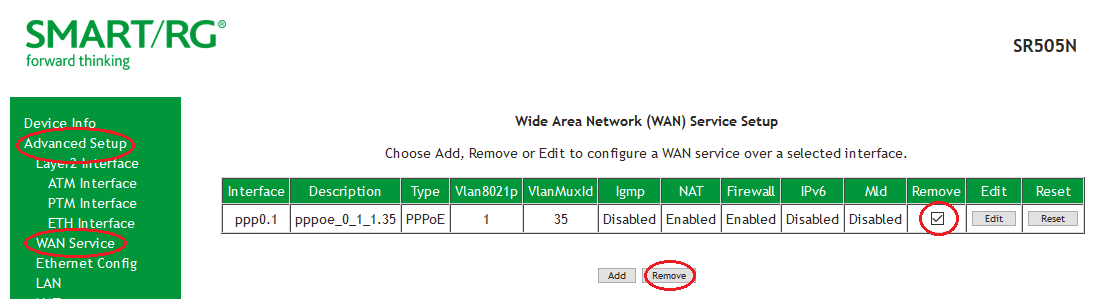
¶ Enable ADSL Interface
3. Under the Advanced Setup menu, click on the Layer2 Interface and then ATM Interface. Click Add and proceed 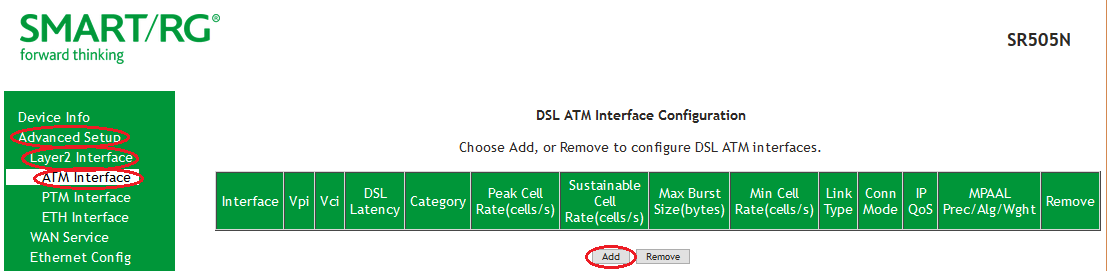 4. On the ATM PVC Configuration page, select the following:
- VPI:0 and VPI:35
- DSL Latency: Select both
- Path0(fast)
- Path1(interleaved)
- Apply/Save
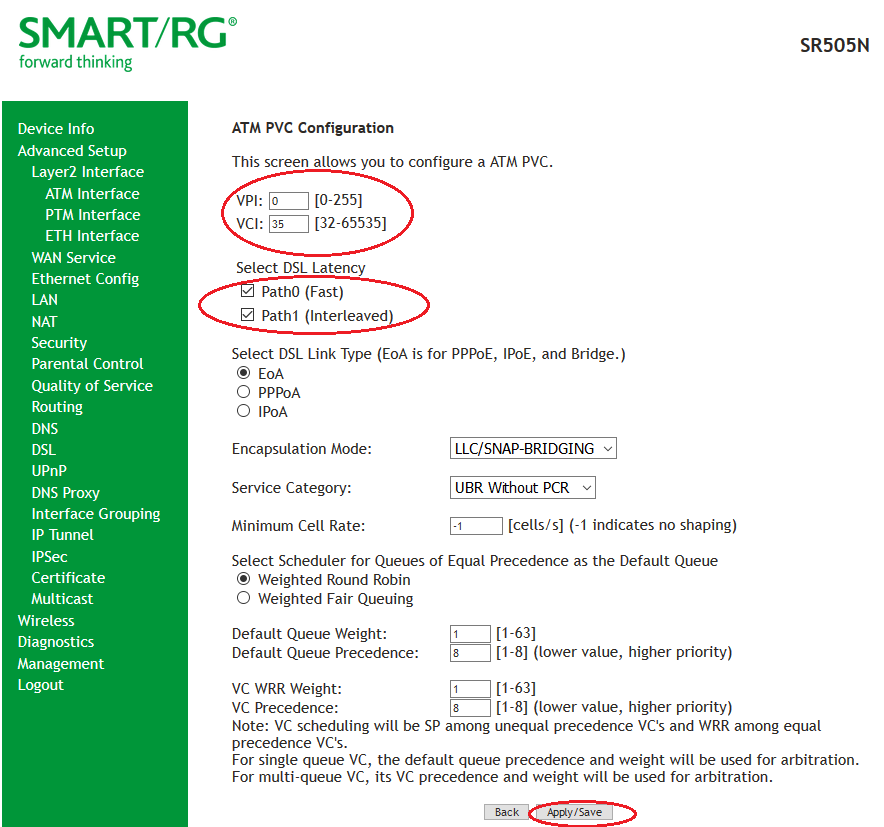 5. Confirm you have configured the ADSL (ATM) interface correctly with the image below:
¶ Enable VDSL Interface
6. Under the Advanced Setup menu, click on the Layer2 Interface and then PTM Interface. Select the Remove checkbox on the ptm0 interface and click Remove. 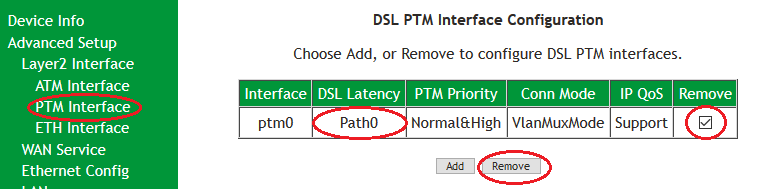 7. Still on the DSL PTM Interface Configuration Page, Click Add and proceed.
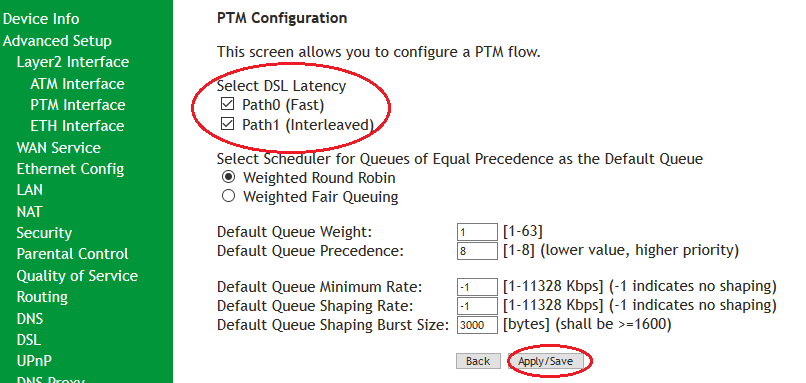
 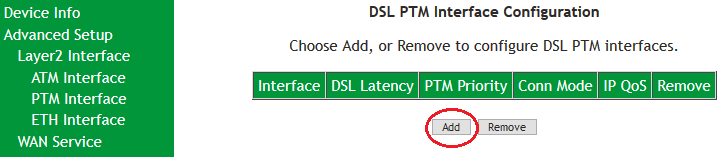 8. On the PTM Configuration page, select the following:
- DSL Latency: Select both
- Path0(fast)
- Path1(interleaved)
- Apply/Save
 9. Confirm you have configured the VDSL (PTM) interface correctly with the image below: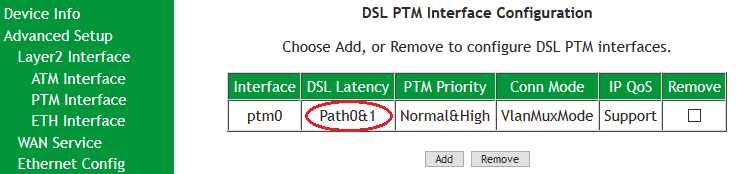
¶ Configure ADSL Interface
10. From Advanced Setup, click on WAN Service and then click on Add to proceed.  11. On the WAN Service Interface Configuration page, select atm0/(4_0_35) from the drop-down menu and click Next.
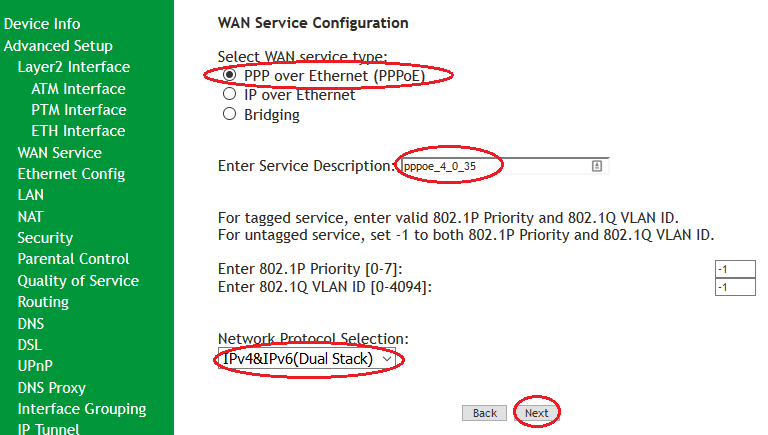
 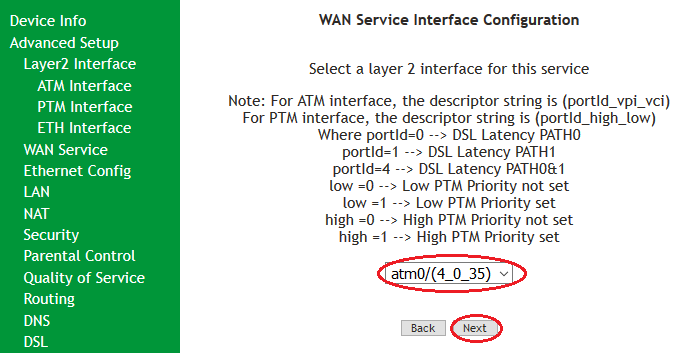 12. On the WAN Service Configuration page, ensure the following:
- PPP over Ethernet (PPPoE) is the active WAN service type chosen,
- Ensure Service Description shows as pppoe_4_0_35,
- Network Protocol Selection is set to IPv4&IPv6(Dual Stack), and click Next
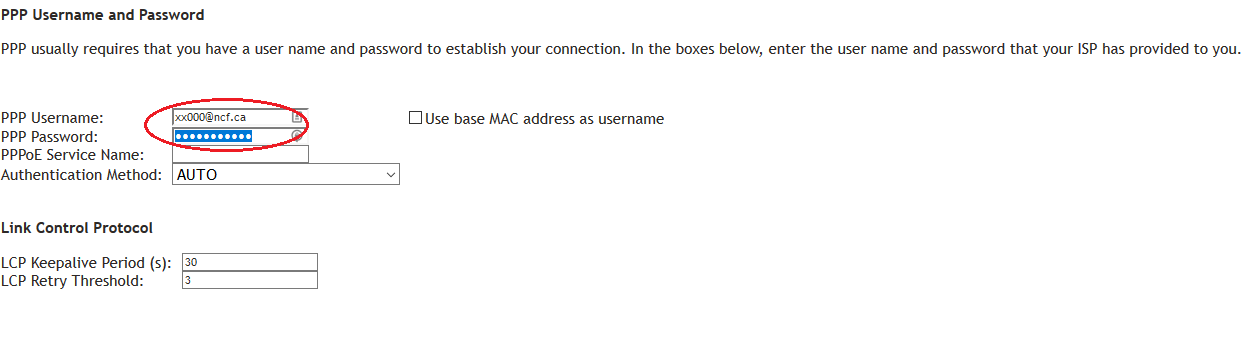
 13. On the PPP Username and Password page, enter your DSL username (format xx000@ncf.ca) and your DSL password into the PPP Username and PPP Password fields respectively. Scroll down the page…
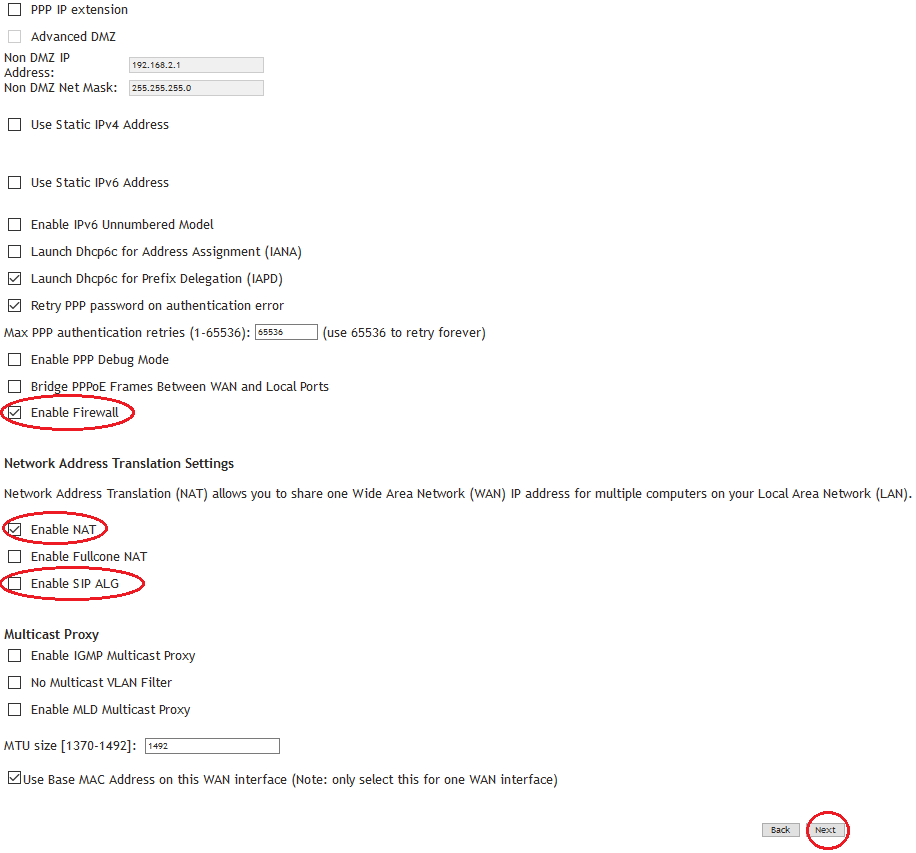
  14. Ensure Enable Firewall, Enable NAT are checked.
- Ensure Enable SIP is not checked. Note on SIP: Although we’ve found that most most VOIP providers prefer to have SIP disabled on modem/routers, your VOIP provider may require this feature. If you’re encountering VOIP issues, confirm this setting preference with your VOIP provider.
- Scroll to the bottom of the page and click Next
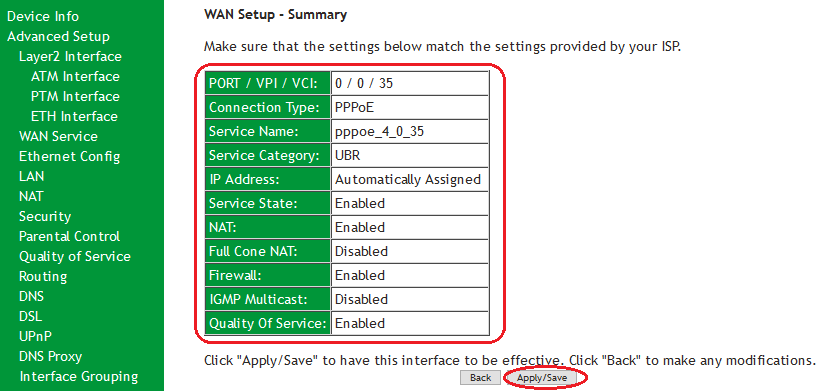
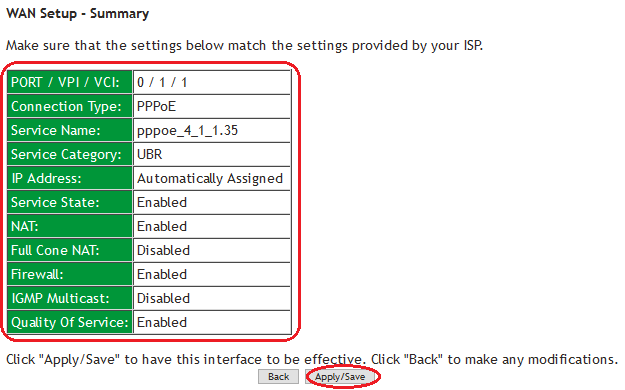
 15. Click on Next twice on the Routing - Default Gateway and DNS Server Configuration pages to skip to the WAN Setup - Summary page.
- Verify that the summary information you see matches the table below,
- Click on Apply/Save
¶ Configure VDSL Interface
16. Back on the WAN Service page, click on Add to proceed. 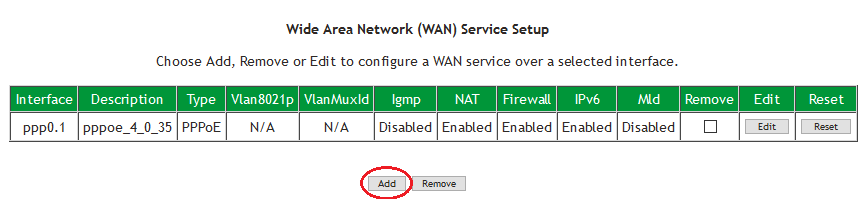 17. On the WAN Service Interface Configuration page, select ptm0/(4_1_1) from the drop-down menu and click Next.
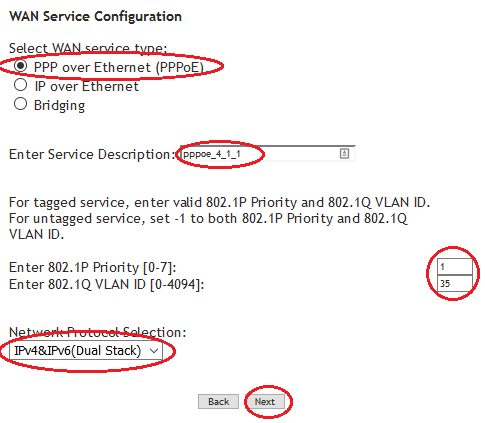
 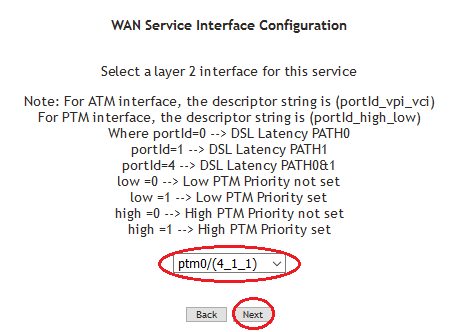 18. On the WAN Service Configuration page, ensure the following:
- PPP over Ethernet (PPPoE) is the active WAN service type chosen,
- Ensure Service Description shows as pppoe_4_1_1,
- 802.1P Priority is set to 1
- 802.1Q VLAN ID is set to 35
- Network Protocol Selection is set to IPv4&IPv6(Dual Stack), and click Next
19. On the PPP Username and Password page, enter your DSL username (format xx000@ncf.ca) and your DSL password into the PPP Username and PPP Password fields respectively. Scroll down the page… 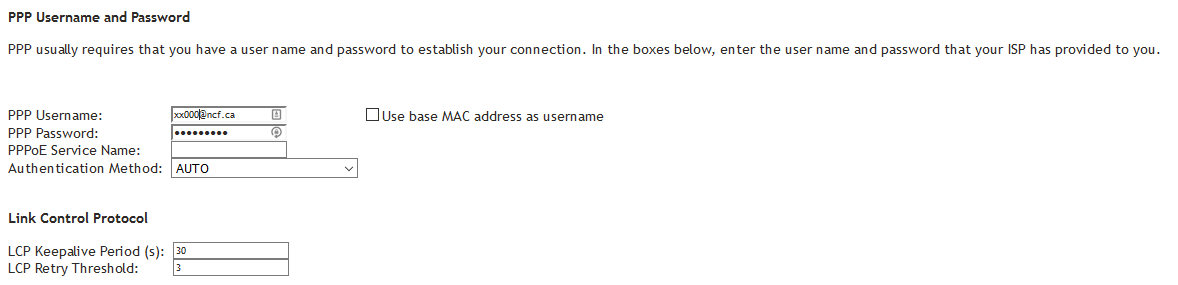 20. Ensure Enable Firewall, Enable NAT are checked.
- Ensure Enable SIP is not checked. Note on SIP: Although we’ve found that most most VOIP providers prefer to have SIP disabled on modem/routers, your VOIP provider may require this feature. If you’re encountering VOIP issues, confirm this setting preference with your VOIP provider.
- Scroll to the bottom of the page and click Next
21. Click on Next twice on the Routing - Default Gateway and DNS Server Configuration pages to skip to the WAN Setup - Summary page.
- Verify that the summary information you see matches the table below,
- Click on Apply/Save.
 22. Confirm that the table on the Wide Area Network (WAN) Service Setup page match the image below and proceed.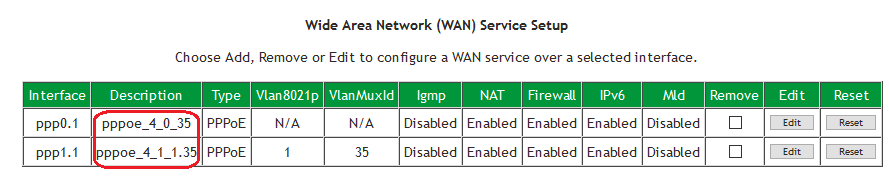
¶ UPnP
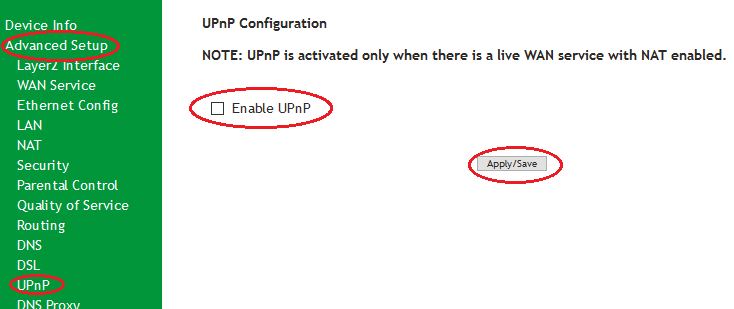
UPnP allows devices on your network to automatically forward ports so they can be accessed from the Internet. While UPnP is convenient, we recommend turning it off for security reasons. 23. From the Advanced Setup on the left, then Select UPnP. On the UPnP Configuration page,
- Uncheck the Enable UPnP box,
- Save the changes with Apply/Save
¶ Wi-Fi Name
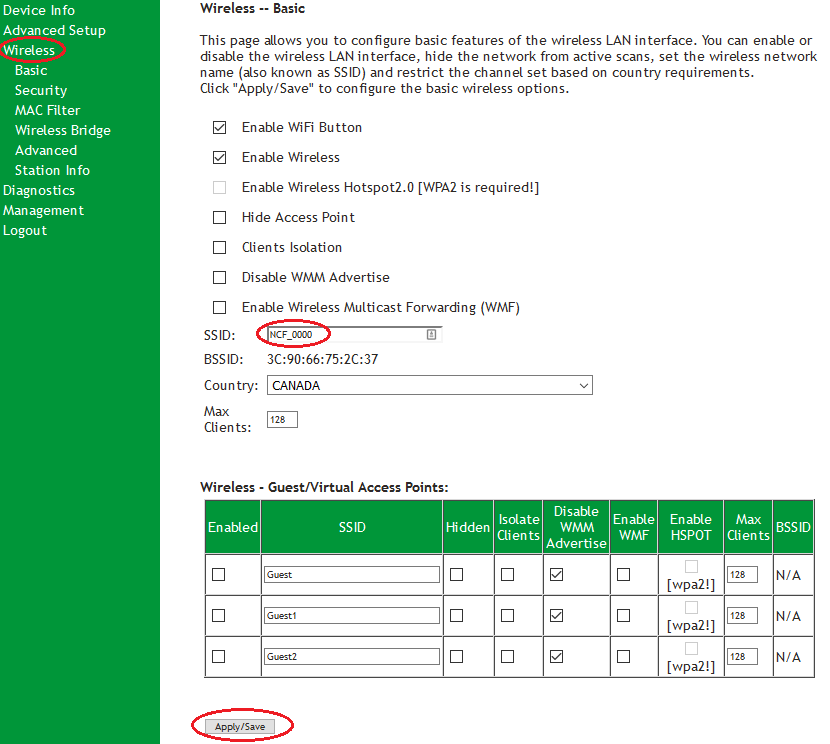
24. Click and on Wireless menu link. From the Wireless - - Basic Page…
- Set the SSID is set to NCF_0000 (NCF uses the last 4 digits of the modem’s serial number).
Note: We recommend that you not use your name or address as this information is broadcast and other people in your area will be able to associate the signal with which home it is coming from.
- Click on Apply/Save at the bottom.
¶ Wi-Fi Security
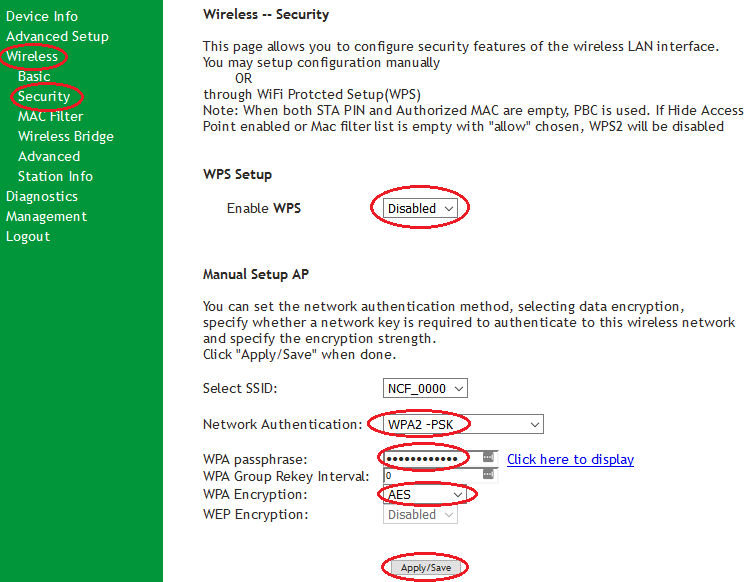
25.Click on the Security link, under the Wireless Menu option.
- Set the Network Authentication to WPA2-PSK
- Set the WPA passphrase to be your DSL-Password
- Set the WPA Ecryption to AES
- Click Apply/save.
¶ Admin Password
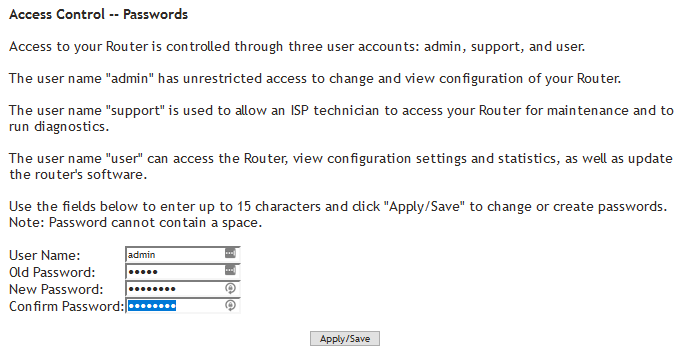
26. Click on Management on the left. Then click on Access Control to reveal a sub-menu and then click on Passwords.
- Enter admin for the User Name
- Enter admin for the Old Password
- Enter your DSL-Password or another strong password as the New Password.
- Enter it once and again below to confirm
- Save the changes with Apply/Save
 27. On Click on Management again, a pop-up log-in screen appears, and asks for sign-in. Use the User-ID admin and the DSL-Password just set.
¶ Disable Support
28. Click on Access Control again and then select the Accounts sub-menu link. Then on the User Access Control Settings page, click on Delete/Modify Account. 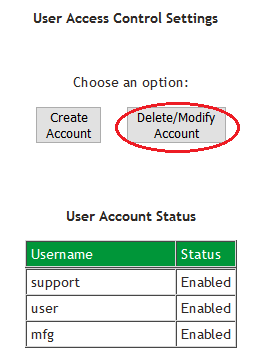 29. On the Delete/Edit Account page, ensure the selected account is support and selected Disable.
- Click Update Account at the bottom of the page and then click Back.
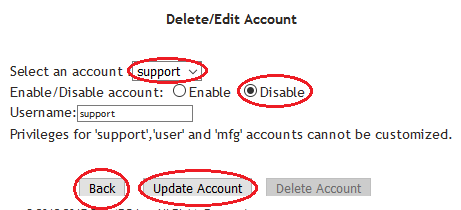 30. Confirm your User Access Control Settings display as follows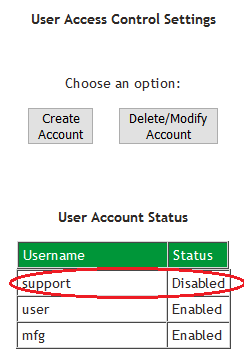
¶ Remote Access
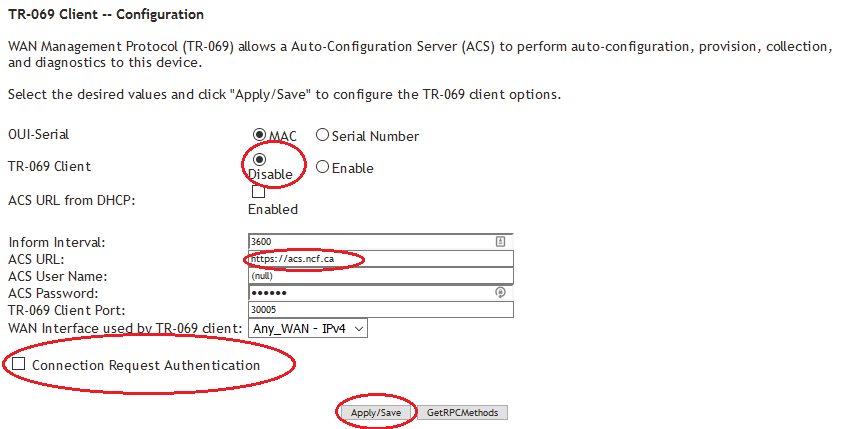
31. Click on Management and then on Management Server. On the TR-069 Client – Configuration page, perform the following changes:
- Set to TR-069 Client to Disable,
- Change the ACS URL to https://acs.ncf.ca,
- Uncheck Connection Request Authentication, and
- Apply/Save
¶ System Log
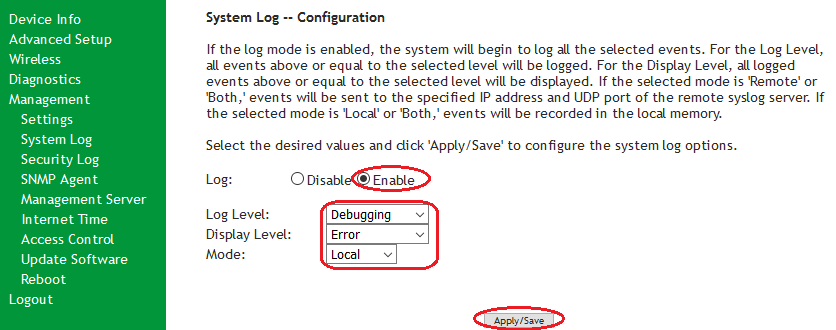
32. Click on Management and on System Log. 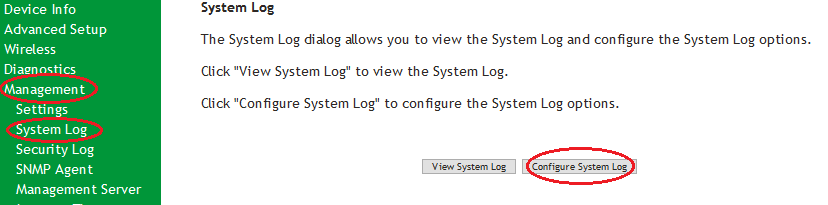 33. Ensure the following settings:
- Log is Enable
- Log Level is Debugging
- Display Level is Error
- Mode is Local
- Click Apply/Save
¶ Internet Time
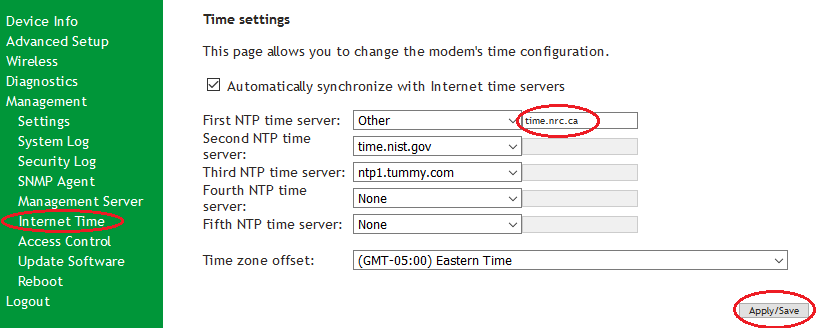
34. Click on Management and on Internet Time. Make the follow changes:
- Set First NTP time server to Other and input the url time.nrc.ca in the adjacent textbox.
- Click Apply/Save
¶ Backup Settings
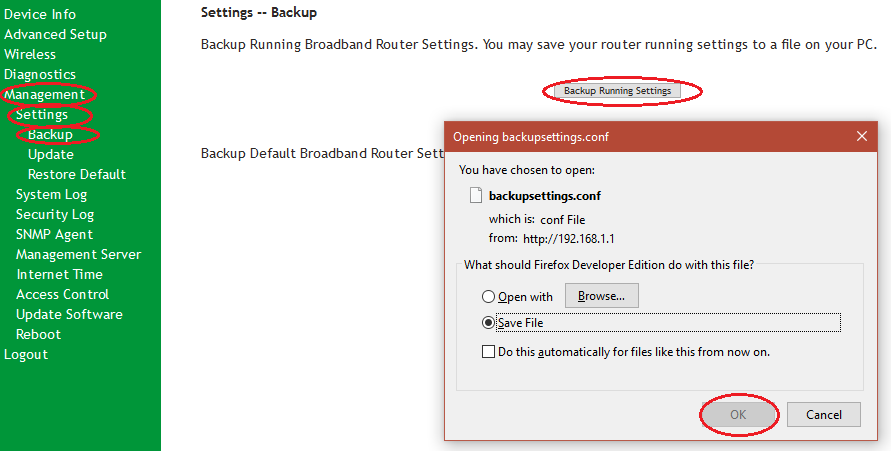
35. Finally, back up your settings in case your modem is accidentally reset or if you need to return this configuration.
- Click on Management and then Settings and then Backup.
- Then click on Backup Running Settings
- Save the back up file to a location you will remember. We recommend including the date and your account ID in the name of the file.
¶ Routed Operation with separate Wi-Fi Router
NCF Support is available to make configuring your SmartRG modem easier and to help you avoid potential mistakes. Here are simpler configuration options for your SmartRG modem:
- You can request a custom configuration file for your NCF DSL connection from support@ncf.ca.
- You may need an alternate means of accessing the internet to download the configuration file.
- Call 613-721-1773 x0 to book a Modem Appointment.
¶ Configure your modem for Routed Operation
If you have a router, we recommend the following configuration steps:
1. Follow the configuration steps outline for Routed Operation with WiFi and make the following changes:
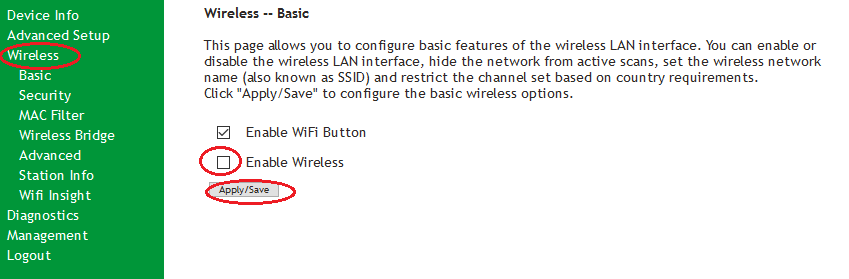
- Under Wireless, Uncheck the Enable Wireless Option,
- Click Apply/Save
¶ Router Configuration
2. On your router, set the Connection Mode or Type to Automatic IP, Automatic DHCP or Dynamic IP mode.
¶ Bridge Operation
NCF Support is available to make configuring your SmartRG modem easier and to help you avoid potential mistakes. Here are simpler configuration options for your SmartRG modem:
- You can request a custom configuration file for your NCF DSL connection from support@ncf.ca.
- You may need an alternate means of accessing the internet to download the configuration file.
- Call 613-721-1773 x0 to book a Modem Appointment.
If you prefer your own external router rather than the one built into your SmartRG unit, we recommend routed operation with a separate WiFi Router. However if you have networking expertise and are confident using the modem in bridge mode then take note of the following before configuring your SmartRG for Bridged operation:
- Once you complete configuring your SmartRG modem for Bridged operation and disconnect from the modem, the Modem’s Web Interface will become inaccessible with Auto DHCP settings on your computer. We recommend:
- Backup Settings: It is particularly important to backup the Running Settings on your modem before and after you configure it.
- Manual IP: Setting a static IPv4 address on your computer, with the gateway IP set to http://192.168.1.1 to regain access to the modem
- Reset the modem: If you need to reset the modem, insert a paper-clip in the Reset hole on the back. Hold for 10 seconds to reset.
- If you set up the modem for Bridge operation, then your router will need to be configured in PPPoE mode with your DSL username and password.
¶ Checklist
Steps |
Menu Navigation |
Parameters |
|
|---|---|---|---|
1 |
http://192.168.1.1 → Manage Gateway (Advanced) |
User Name: admin Password: admin |
|
2 |
Advanced Setup → WAN Service |
Remove ppp0.1 from WAN Service Table |
|
3 |
Advanced Setup → Layer2 Interface → ATM Interface |
Add ATM: vpi:0 vci:35 DSL Latency: FAST and INTERLEAVED |
|
4 |
Advanced Setup → Layers2 Interface → PTM Interface |
Remove ptm0 with Path0 Add PTM: DSL Latency: FAST and INTERLEAVED |
|
6 |
Configure ADSL |
Advanced Setup → WAN Service |
Add atm0/(4_0_35) Bridge (br_4_0_35) |
7 |
Configure VDSL |
Advanced Setup → WAN Service |
Add ptm0/(4_1_1) Bridge(br_4_1_1.35)
|
9 |
WiFi |
Wireless |
Disable Wireless |
11 |
Management → Access Controls → Passwords |
|
|
12 |
Management → Accounts → Access Controls |
Delete/Modify Account
|
|
13 |
Management → Management Server |
|
|
14 |
Management → System Log |
Configure System Log
|
|
16 |
Management → Settings → Backup |
|
Steps to Configure SR505N for Bridge Operation
¶ Firmware
SmartRG firmware update/s available to NCF members only. Firmware updates have been validated and tested against a custom configuration for NCF DSL members. Non-NCF requests will be disregarded.
Caution:
- We recommend that you only do firmware updates over an Ethernet connection and NOT via Wi-Fi.
- DO NOT power off the modem during a firmware update, as this will cause your modem become unresponsive (stuck in brick/recovery mode).
The current firmware available to the NCF Office is 2.6.2.6.
You can verify your firmware by checking the software version on the Device Info page. ⚠Caution: Modems with firmware older than version 2.5.0.14 must be first upgraded to version 2.5.0.14 before upgrading to version 2.6.2.6. Failure to do so may cause functionality problems which will not be covered by the manufacturer’s warranty. 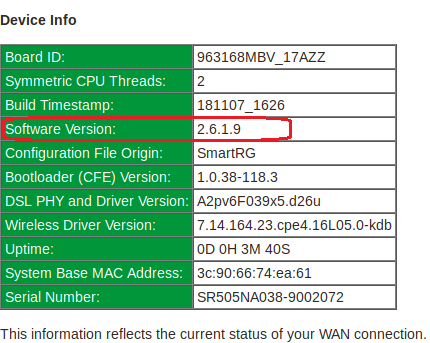 To request firmware, email mailto:support@ncf.ca support@ncf.ca. To install this new firmware onto your modem perform the following steps:
- Download the firmware file and save it to a location on your computer that you can find easily.
- Open a web browser and go to the address http://192.168.1.1
- Select Manage Gateway (Advanced) and log in (by default the username is admin and password is your dsl password as shown in Getting Started above)
- Click on Management → Update Software
- Click on Browse
- Upload the firmware file that you downloaded in step 1.
- Click Update Software
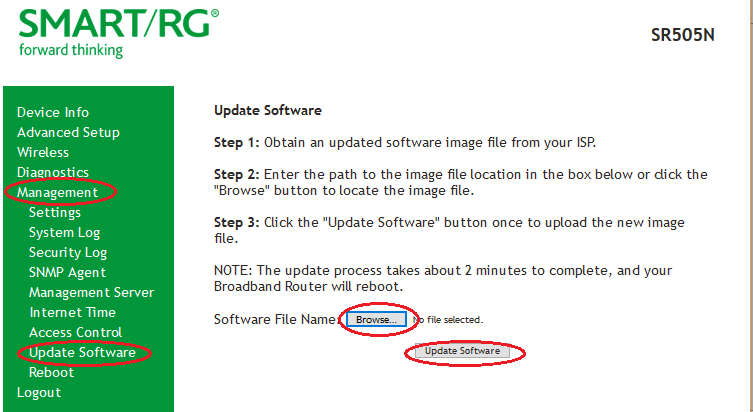 Note: the modem will reboot once the new firmware has been uploaded. This process may take up to 15 minutes to resync (DSL light returns to solid green) and reconnect (the internet light starts blinking again).
¶ See Also
- Modem Configuration - for a complete list of instructions for all NCF modems
- About SmartRG modem lights
- SmartRG SR505N modem manual
- About Your SmartRG SR505n
- Changing WiFi Channels on SmartRG modems
- Dynamic DNS
- Port forwarding with the SmartRG SR505N